Working with the Articulate Storyline
Interface
We redesigned Articulate Storyline for speed and flexibility.
Here's how to take advantage of the streamlined workflow and customizable
interface.
Switching Between Story View and Slide View
Story View gives you a bird's-eye view of your course
layout. It's useful for grouping slides into scenes and managing navigation. On the other
hand, Slide View is where
you build individual slides and layers. ·
Go to the View tab on the ribbon, and click Story View or Slide View.
·
Go to the View tab on the ribbon, and click Story View or Slide View.
 ·
Click the tabs just below the ribbon. The Story View tab
is always visible. Additional tabs will open in Slide View as you build
individual slides.
Tip: Since Storyline
always opens in Story View, an easy way to quickly jump into Slide View is to
double-click the slide you want to edit.
·
Click the tabs just below the ribbon. The Story View tab
is always visible. Additional tabs will open in Slide View as you build
individual slides.
Tip: Since Storyline
always opens in Story View, an easy way to quickly jump into Slide View is to
double-click the slide you want to edit.


Working with the Question Editor
We've streamlined the question editor, so creating quizzes is
even easier. When working with question slides, you can switch between Form View and Slide View without opening any
additional windows or interrupting your workflow. Just click the Form View and Slide View buttons
in the Question panel
to toggle back and forth.
 Undocking and Redocking Panels
Have you ever wanted to move some of Storyline's panels to
another monitor so you have more room to work? Now you can. Click the title of
a panel and drag it to a new location, or double-click the title to pop
the panel out. To redock a panel, click the Redock button in the panel's upper right
corner.
To redock a panel, click the Redock button in the panel's upper right
corner. To redock all panels at the same time, go to the View tab
on the Storyline ribbon and click Redock All
Windows.
To redock all panels at the same time, go to the View tab
on the Storyline ribbon and click Redock All
Windows.
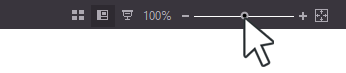
 Changing the Zoom Level


Get a big-picture view of your course, or zoom in for a close-up
view. Here are several ways to adjust the zoom: ·
Zoom Percentage: Next
to the zoom slider in the lower right corner of your screen, you'll see a zoom
percentage. Click the percentage to bring up the zoom window where you can
change the zoom to whatever you like. You can also access this window by going
to the View tab
and clicking Zoom.
·
Zoom Percentage: Next
to the zoom slider in the lower right corner of your screen, you'll see a zoom
percentage. Click the percentage to bring up the zoom window where you can
change the zoom to whatever you like. You can also access this window by going
to the View tab
and clicking Zoom.
 ·
Fit to Window: To
the right of the zoom slider, you'll see a small rectangular button with
arrows. Click this button to make everything fit in the viewable area of your
Storyline workspace.
·
Fit to Window: To
the right of the zoom slider, you'll see a small rectangular button with
arrows. Click this button to make everything fit in the viewable area of your
Storyline workspace.
 Or, go to the View tab and click Fit to
Window.
Or, go to the View tab and click Fit to
Window.


Using Keyboard Shortcuts
We've added dozens of keyboard shortcuts to Storyline to help
you work faster. See the complete
list here.
Setting General Application Options
Use Storyline's general
application options to keep your software up to date, take advantage of
auto-recovery features, set your spelling/auto-correct preferences, configure
proxy settings, and even change the interface language. Access these options by
going to the File tab on the ribbon and
choosing Storyline
Options.

This is dummy text. It is not meant to be read. Accordingly, it is difficult to figure out when to end it. But then, this is dummy text. It is not meant to be read. Period.
ConversionConversion EmoticonEmoticon